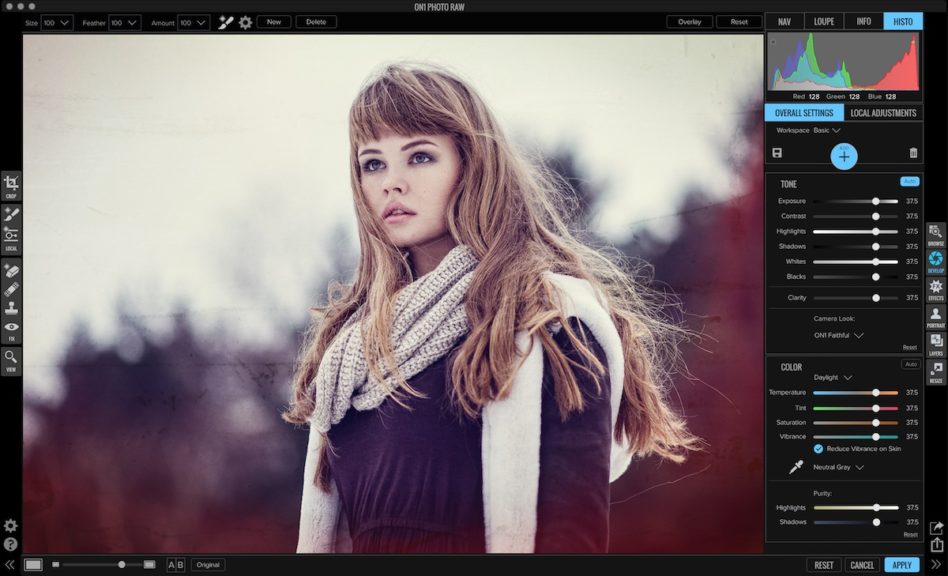
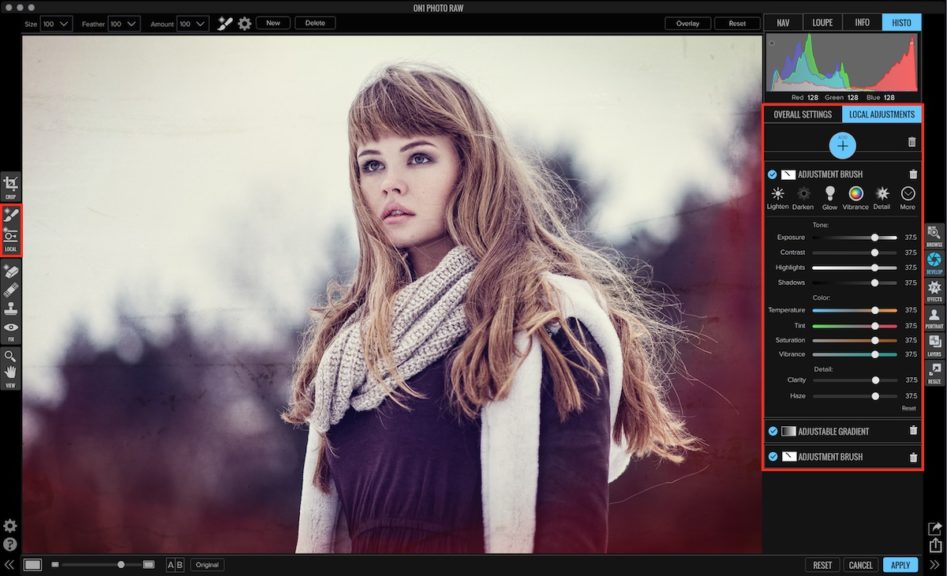
In ON1 Photo RAW, the Adjustment Brush and Adjustable Gradient filters from Effects will be full-fledged tools you can access and edit in any module. These will be part of the shared tools like Crop, Retouch, Perfect Eraser and Clone that will be available and re-editable, nondestructively, in Develop & Effects. In the tool-well on the left you see icons for the Adjustment Brush and Adjustable Gradient tools. At the top in the tool-options are are the familiar controls for adjusting brush size, opacity, feather, etc. On the right you see two tabs below the navigator; Overall Settings and Local Adjustments. Overall Settings is what you see today in Photo 10, the control panes or filters that affect the entire photo.

The new Local Adjustments tab is where you control the Adjustment Brush and Adjustable Gradient tools settings. It works just about like the stack in Effects. You can use these tools as many times as you like, re-editing their settings and masks from any module. You can create multiple instances of each tool to affect different areas in different ways just by clicking the plus button. We think the visual stack, like filters or layers, will be easier to figure out than the small on-screen markers some apps use. You’ll have the same masking section roll-down as Effects to see a larger mask preview as well as reset, invert or copy/paste a mask. We included the basic adjustments you use most commonly. Keep in mind you can still stack and paint any other filter in Effects too.

We would love to get your feedback. Does it make sense?
— Dan Harlacher


16 comments on “Local Adjustment Tools”
On August 30, 2016 at 10:02 am Petr Krenzelok wrote:
Will it remember opacity between the strokes, as with on1 Photo 10? Also – I spotted the paint by color/replace color mode on one screenshot, so I wonder, if I will be able to adjust colors for various strokes, or will I have to add new adjustment layer for a different color? As for Photo RAW not having visual markers, we will see, how it works …
On August 30, 2016 at 12:13 pm David Price wrote:
Hi Dan
The idea makes sense, if the local adjustments work in a similar way to, or even in exactly the same way, as the filter stack within photo 10. Then that sounds great.
Hopefully masking will be just as flexible and precise, maybe even more so than we have now.
The comments about visual markers went over my head, perhaps they are a Photoshop thing?
Best wishes, David Price.
On August 30, 2016 at 1:35 pm David Hall wrote:
Having the Adjustment Brush and Adjustable Gradient in Effects does make sense and is a good idea.
Dan,
Any time filters, presets, functionality can be available in all the obvious modules [but you would not want Adjustment Brush in Resize for example] makes sense and makes processing easier. If of course all or the major features are available.
On the subject of brushes, it would be nice if you could have more than the single shape of round. There are a lot of times where you want a very straight edge and the round brush shape does not work that well ….. it takes a lot of careful work. If a rectangle or square shape were an available selection I think it would be quite helpful.
Keep up the good work!
David Hall
On August 30, 2016 at 7:44 pm Don Maclean wrote:
How about adding Flow and Opacity settings to the adjustment brushes?
For the brush tool it would be nice to have, in addition to the Size, Feather and Opacity settings, a Flow setting that offers greater control of the amount of transparency applied. A Flow option that allows the user to draw over the same area with the brush in user selectable increments (as a percentage). In the case where the Opacity is set to 50% and 10% Flow is selected, for example, the opacity of the mask is built up in 5% increments per stroke, until the 50% level is reached.
And, if possible, an AirBrush option that allows the opacity and flow to build up over the duration of the mask’s application whilst the brush remains stationary.
On August 30, 2016 at 10:42 pm Petr Krenzelok replied:
You can kind of simulate Flow. Lower your opacity to something like 10-15% and use your brush. I you want to go higher, just release the mouse button and (re)click. I know it’s not ideal, but for me usable enough …
On August 31, 2016 at 3:17 am Don Maclean replied:
Actually that should read “How about adding Flow and AirBrush settings to the adjustment brushes?” Opacity is already accounted for.
On August 30, 2016 at 8:43 pm Brian Tucker wrote:
Sounds very useful. Would love to see a little demo video.
On August 31, 2016 at 9:13 am Clinton wrote:
It took a little bit, but yes, it makes sense now. You are basically taking the Adjustment Brush and Adjustment Gradient filter from Effects and making it its own tab that is also available in Develop. I barely used Enhanced with Photo 10, but you guys are adding so much capability into the Develop module that I wonder if I’ll be using Effects that much when I get Photo Raw. I wonder if the two modules will just eventually merge in future releases.
On September 1, 2016 at 1:02 pm keith simpson wrote:
If I use three or four brushes in RAW and decided that I want to re-edit one of them, how will I know the area of the photo effected by each brush if there is no visual marker? Could you produce a short video to demonstrate the idea you are working on?
On September 2, 2016 at 12:15 pm Anthony Tokarz wrote:
Outstanding! Already heavily using this feature in Capture One which outshines the adjustment brush in Lightroom. It sounds like you are going along the same path. Most people dont use this feature and is HUGE for creative adjustments. Really looking forward to your RAW update, since I have been a user for many years. It would be great if you could replace my Capture One workflow.
On September 2, 2016 at 1:35 pm Jean Glasser wrote:
Hello,
Are all ajustements (including local) saved as some kind of sidecar file, or saved as some sort of (huge) psd file if you wish to re-edit the image ?
Thanks.
On September 3, 2016 at 5:41 am Roger Mathews wrote:
Please can we have a invertable radial filter. It is so good at adding spots of light.
On September 4, 2016 at 10:12 am Thomas Piepszak wrote:
A back arrow in adjustment boxes to undo last step would be helpful. I am new to OnOne and tried to invert a selection only to find it difficult to do– instead of searching – it should be obvious
On September 12, 2016 at 8:49 pm Christian von Ow wrote:
Hi Dan
I really like the Lightroom Feature to be able to set and toggle two adjustment brush settings (a/b). This is a big timesaver, e. g. to switch between settings with different opacity and soft/hard edges.
It would be really cool to have something similar inside ON1 Photo RAW!
On September 13, 2016 at 6:09 am Alex Reusch wrote:
In many cases, I found the simple spot removing tool of Lightroom works better than ON1 10 clone and erase tool. Many times, ON1 10 leaves visible smearing and does not provide good results. I really hope, that you can improve in this category of ON1 RAW.
On September 13, 2016 at 6:19 am Alex Reusch wrote:
When working with adjustment brushes, it would be great if there is a separate list of each edit made. If you want to revert one edit, it would be nice, if you could go back to a specific state or just delete an individual edit from the list (without reverting the other edits that followed).
Please review our our privacy policy for information about how we use the data we collect.